Charging your phone wirelessly on your motorbike
S ince the weather was not terribly good during Ascension Day this year, I tried to make maximal use of my time by starting a little crafting project.
I often go for shorter or longer rides with my motorbike using a mobile phone for navigation or tracking my route (I have grown fond of Calimoto btw. which I can only recommend). For the ride I usually attach my phone to the motorbike using the Ram Mount X-Grip, which holds the phone in position no matter the speed or terrain - rock solid stuff.
However, the problem with using your phone as a navigation device is that having GPS constantly turned on can quickly drain your battery. Luckily my motorcycle has a power outlet which allows me to plug in a USB adapter to charge my phone. Alas, since I am a lazy rider I got tired of having to unplug the phone everytime I park the bike only to plug it in again when I resuming my ride. I looked for a more time-saving option thad didn’t involve wrapping cables around the handlebar or fiddling with finding the tiny USB ports on the phone. The solution was to upgrade my mount with a wireless charging capability which is cheap, easy to do and works surprisingly well - even if your phone does not support wireless charging (like mine).
Shopping list
I used the following parts for my project. Most of them can be purchased from your trused local Chinese wholesale store. Click on the links to see exactly which parts I used.
- a wireless charger
- a USB car charger
- (optional) some Shrink-Wrap tubes to insulate the connectors
- Plasti Dip to make everything wateproof
- (optional) a wireless adapter if your phone does not support wireless charging out of the box (like mine)
- (optional) a USB cable to attach to your motorbike permanently (you can use the one that came with your phone if you can spare it)
- (optional) a Y-cable for faster charging if your USB charger has two ports
Let the crafting begin
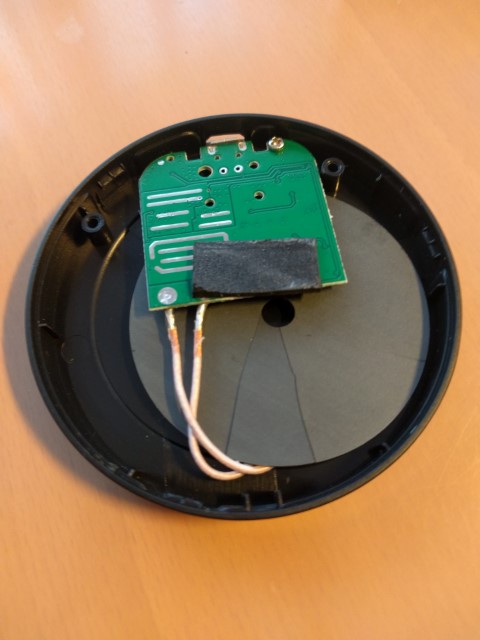
I first snapped open the wireless charger to expose its internal parts. Turned out it only consisted of a inductor which was glued to a thin, round metal plate and a small circuit board, both connected with two short cables. The metal plate was broken (probably when I opened the case), but that did not seem to affect functionality.
I first removed the round plastic sticker which covered the base plate of the mount. Then I first glued the metal plate to the mount and then the inductor on top. The sizes matched perfectly. It almost looked like the parts were made specifically for this mount ![]() .
.
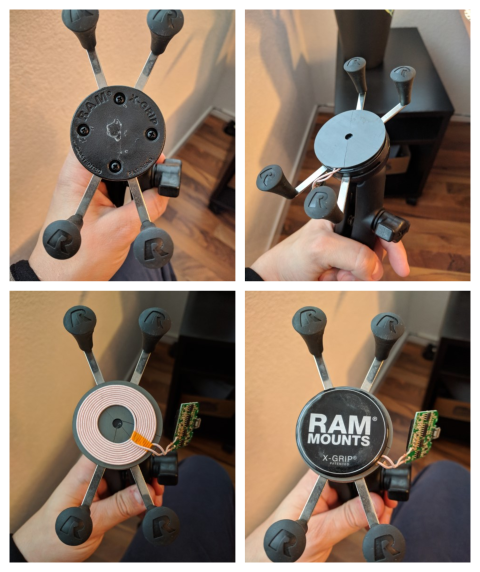
After reattaching the plastic lid with the Ram Mount the mount looks almost like before the modifications (apart from the cables hanging out). I did a small test run before covering everything with PlastiDip. Everything worked as expected. Let’s make it waterproof!
Making it waterproof
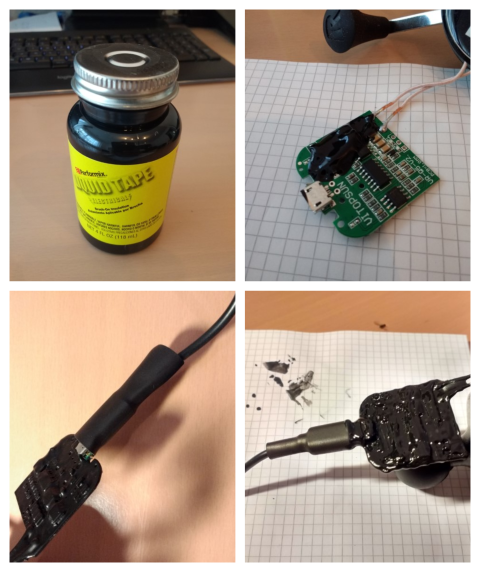
Since the modified mount will be permanently attached to the motorcycle (including the cable, circuit board and inductor, but without the USB charger) I had to make sure the damn thing won’t be affected by the weather. To protect the connections I used the shrink wrap tube (be sure not to let it get too hot as the electronics may be quite sensitive). The circuit board was covered with three layers of Plasti Dip which (apart from being waterproof) has the nice property of also acting as an insulator. I also covered the shrink wrap tube, the cable between circuit board and inductor and the area between plasic lid and inductor with some Plasti Dip to make sure absolutely no water can get to it.
Installation
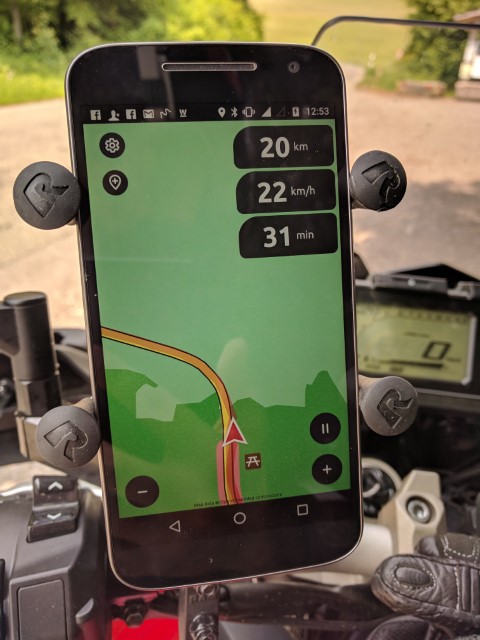
The modified mount was then reattached to the handlebar and the cables were fixed with some straps. The loose end of the charging cable was covered with a protective cap and the USB charger stoved away unter the socius seat. To get a bit more power from my USB charger I also connected the Y-cable with both ports of the USB charger. I put the wireless adapter under the back cover of my phone and tested it with on a short test ride. Everything looked fine.
Bottom line
After some driving around with the navigation app turned on I can say that the charging power is enough to keep my battery level stable (but not really charging). I wouldn’t go on a ride with an almost empty battery though. You can probably get a bit more juice out of the charger by removing the RamMount-Sticker and bringing the phone a bit closer to the inductor coil. Other people might see other results depending on the bike, the cable, the USB adapter or the phone but for me that’s not much of a problem though since I always returned from a days drive with more than 90% battery left. The mount is now permanently attached to the motorbike and the modifications are barely visible. The usability is now also great: Put your phone into the mount and you’re done! ![]()